Git Commands & Concepts – Demystified (part 2)

Being overwhelmed by Git's commands & concepts is unfortunately not too uncommon. This second post in the small series, aimed at making your life with Git more durable, focuses on managing files locally!

Git Commands & Concepts – Demystified (part 2)

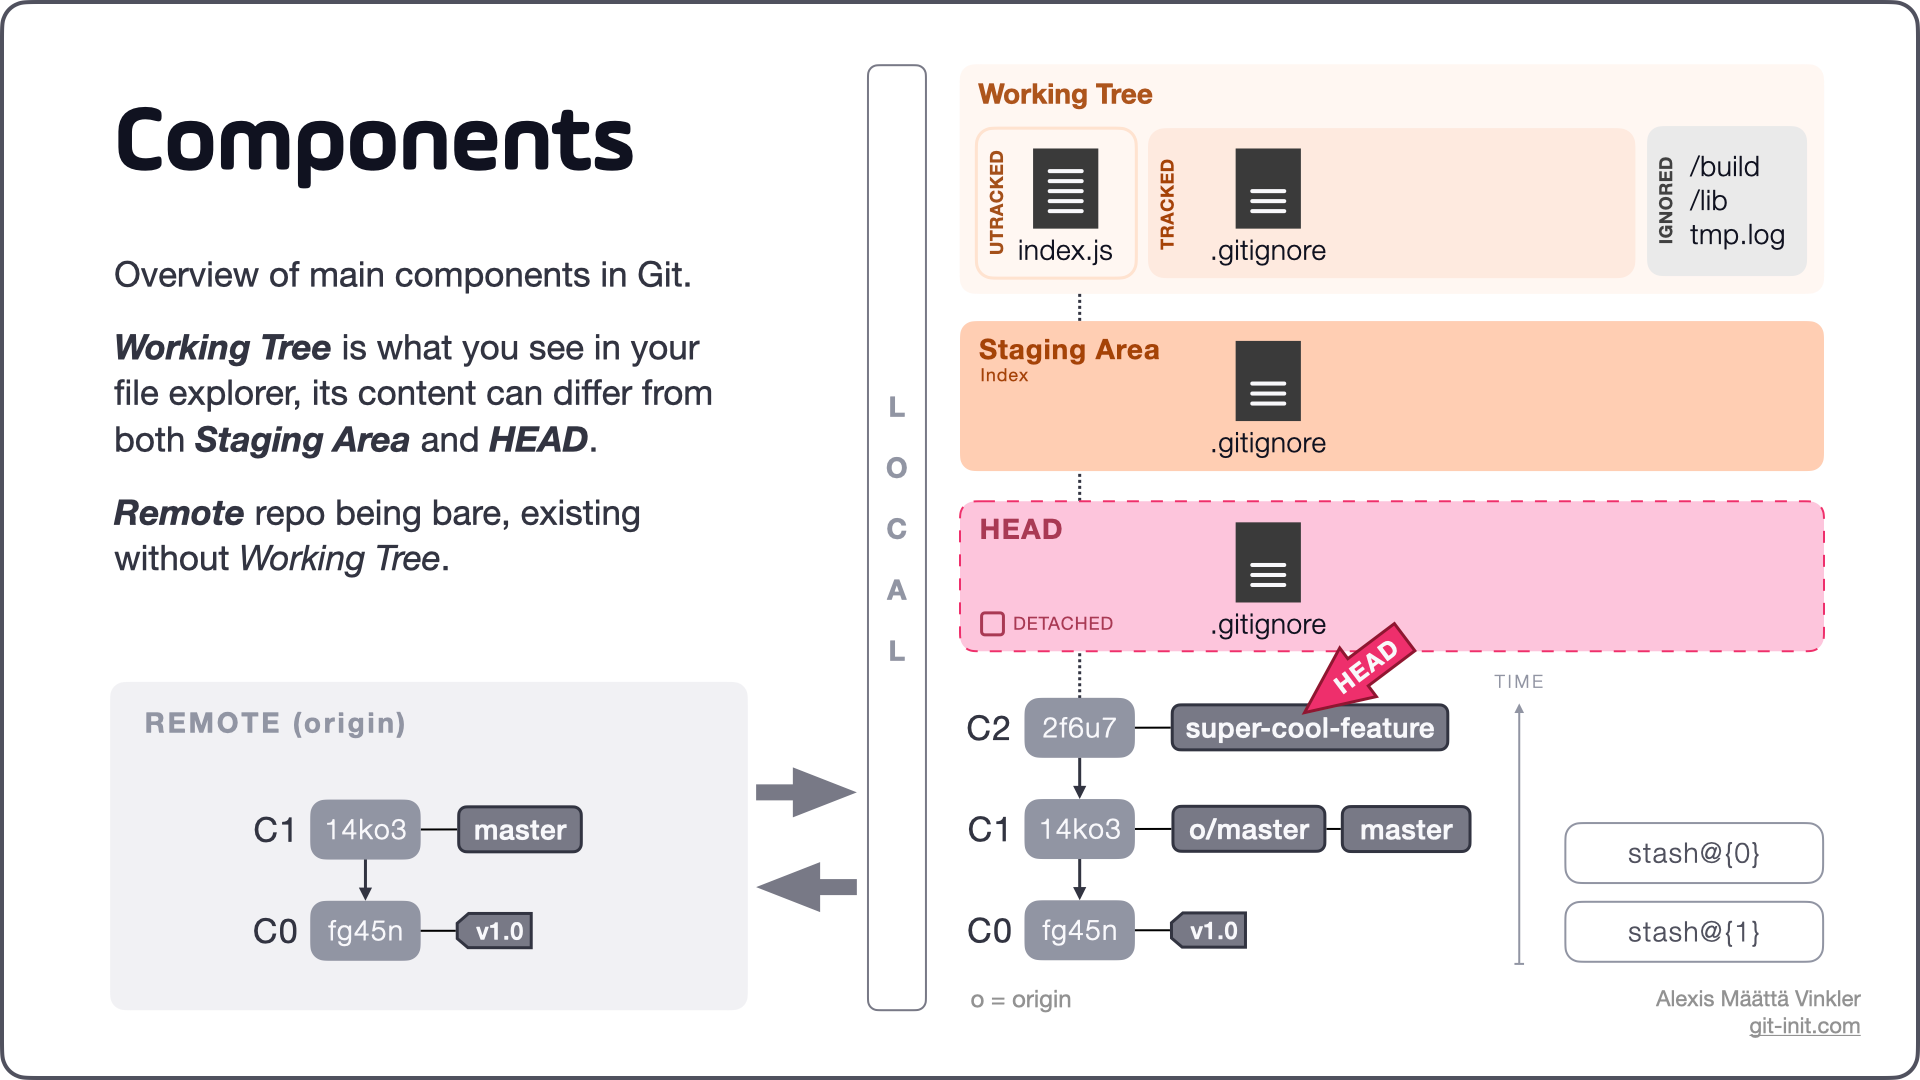
This is the second post (out of three) in the short series demystifying common commands and concepts with Git. In the previous post we looked at all main entities of Git worth knowing. In this post we'll instead focus on understanding workflows which manipulates these entities.

Familiarising yourself with below concepts and actions will for sure aid you in your day-to-day Git usage. 🚀

Remote vs Local

Most of the commands performed in Git happen locally (offline) without any connectivity between the remote and local repositories; you can even work completely without a remote counterpart! In essence, only clone, fetch and push are commands that send and receive data between a local and remote repository; the rest of the commands only manipulate data locally.

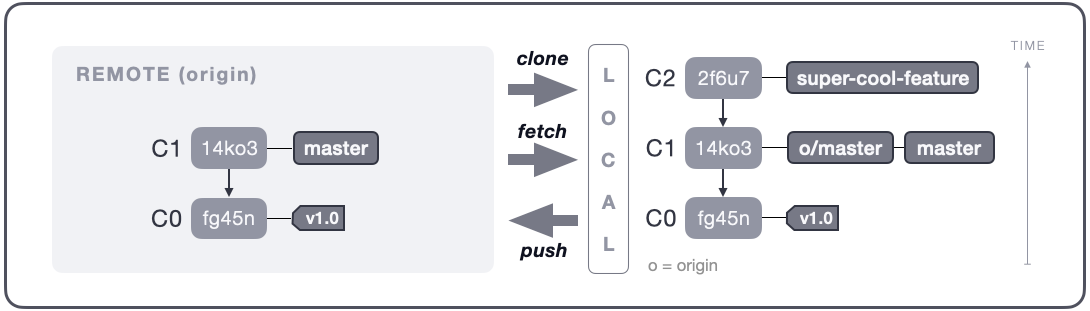
  • Clone: Copies an entire remote repository down to your local machine, setting up a cloned version and checks out the default branch (generally master); this action is done only once.
  • Fetch: Updates remote references in your cloned local repository. E.g. if a developer has pushed changes to a remote branch, those changes will be pulled down to your repository whenever fetch is performed. Note: fetch won't automatically merge any changes, only update references.
  • Push: Makes your local changes publicly available in a remote repository. E.g. the most basic way of sharing work with team members.

With the above simple workflow in mid, let's continue digging into the actual work happening locally, starting with the file states.

Local file states

With Git, all files in your project will be in either of three main states: untracked, tracked, or ignored; where ignored files are essentially explicitly untracked. Furthermore, as for all tracked files Git also keeps track of more specific states related to these, such as modified or deleted. Let's take a closer look!

Generic file states

Below is an illustration highlighting in which areas locally (Working Tree, Staging Area, and HEAD) the generic states untracked, tracked, and ignored are present, followed by a short description of each.

Note: In reality HEAD is just a pointer and not an area of its own. In this illustration though, the pink HEAD area represents the content of the commit the pointer is currently referencing.

Not quite sure how HEAD and commits relate to each other? Take two minutes and revisit this post – What is HEAD in Git?
In above example, no changes have been made since the master branch was checked out; Working tree is clean.
  • Untracked: Status of recently added project files, not yet under version control, nor ignored in .gitignore. Any changes to these files aren't detected by Git. Untracked is the default status of all project files.
  • Tracked: Status for all files currently under version control, in contrast to files that are either untracked or ignored. Any changes to tracked files are automatically detected by Git.
  • Ignored: Status similar to untracked, but with the main difference that these files have explicitly been ignored (untracked) using a .gitignore file. Typically libraries, build folders, and log files are explicitly ignored.

Specific states for tracked files

For all tracked files, Git also keeps even more specific states in mind. Git knows if a file is new, modified, renamed, or deleted. These four states are present for tracked files both in the Working Tree and Staging Area.

Below is an illustration showcasing an example with a couple of files in different states. Just like the output of $ git status, only differences between Working Tree <=> Staging Area, and Staging Area <=> HEAD are shown.

Above, both Staging Area and Working Tree contains differences relative to each other and HEAD.

Similarly to the illustration above $ git status would give us the following output:

As we can see, Changes to be committed lists differences between HEAD and Staging Area. Similarly, Changes not staged for commit lists files containing differences between tracked files in Working Tree and Staging Area. Note that even brand new files (main.css in this example) becomes tracked as soon as they are added to the Staging Area – no need to commit files to allow Git to begin tracking changes!

Finally, as already mentioned, under Untracked files newly created project files (index.js in this example) are listed that have not yet been staged; no changes to these files are recorded until they are added to the Staging Area, and hence becomes tracked.

With the different file statuses fresh, let's continue to examine what actions (commands) are used to move files in between Working Tree and Staging Area, ultimately creating a new commit.

Local file workflow

Knowing how to manipulate files in between the different areas are key in becoming proficient in working with Git. Below illustration, including the following description, highlights what command performs which action. Again, it's worth reminding ourselves that all commands are performed locally without any server interaction.

Overview of what commands transfer files in between the different areas.
  • Add: Moves files from Working Tree to Staging Area. It's used both for tracked and untracked files.
  • Restore: Restores changes made to files in Staging Area or Working Tree. When used for files in Working Tree it resets them to their initial state based on HEAD, discarding any changes made. For files in the Staging Area, restore only unstages them by moving the changes back to the Working Tree.
  • Commit: Creates a new commit (e.g. commit object) by persisting any staged changes. Once done, HEAD automatically moves to the new commit. For a more detailed description of commit, see this post.

Prior to version 2.23 of Git, the commands reset and checkout had to be used respectively to perform the two different restore actions described above.

# Unstage changes
$ git reset HEAD <file>

# Discard changes in Working Tree
$ git checkout -- <file>
  • Diff: Displays changes in more detail, between Working Tree <=> Staging Area and Staging Area <=> HEAD.
  • Stash: Stows away changes made to the Working Tree (and/or Staging Area) not yet ready to be committed. E.g. It saves your local modifications away and reverts the Working Tree to match HEAD.

Apart from the actual commands above, these two terms are also important to know.

  • Stage: Everyday term used to describe the add operation. E.g. "Stage your changes."
  • Unstage: Everyday term used to describe the action of restoring changes from Staging Area back to Working Tree. E.g. "Unstage your changes."

Conclusion

We've now gone through the most common operations used in day-to-day activities to manage files in our local repository. However, there are still some commands left that need addressing, particularly related to integrating changes between branches and manipulating history; I'm talking about merge, rebase, and cherry-pick among others.

Continue to the final post in this series to see above mentioned operations illustrated using the same mental model. 🤠

Git Commands & Concepts – Demystified (part 3)
Being overwhelmed by Git’s commands & concepts is unfortunately not too uncommon. This final post in the small series, aimed at making your life with Git more durable, focuses on branch manipulation!

I hope you enjoyed reading this post, and that you now have a better understanding of how Git keeps track of file changes at various stages.